Memory · MCP · Agent · Tutorial · CLI
Your AI Agent Now Remembers Your Project: Persistent Memory with vem
How to give your AI coding agents (Claude, Copilot, Cursor) long-term memory of your architecture, decisions, and sprint state using vem's memory layer and MCP server.
Prerequisites — Install vem and Link a Project
You need the vem CLI installed, an authenticated account, and a repository linked to a vem cloud project. If you completed the Cycles tutorial you are already set up — skip to the next section.
Sign up at vem.dev, grab your API key from vem.dev/keys, then run the three commands below.
Install, authenticate, and link
# 1. Install the CLI globally
npm install -g @vemdev/cli

# 2. Authenticate with your API key from vem.dev/keys
vem login <your-api-key>

# 3. Initialise memory in your repo and link to a cloud project
cd my-project
vem init
vem link

# Confirm everything is connected
vem status
The Problem: AI Agents Forget Everything
Every time you open a new chat with your AI coding assistant you spend the first few minutes re-explaining the same things: what the project does, which patterns you follow, what you were just working on, and why you made the architectural choices you did.
This is not a UX quirk — it is a structural gap. AI agents are stateless. They have no memory between sessions. The work you do to orient them at the start of each session is pure overhead, and the accumulated reasoning from previous sessions is permanently lost.
vem solves this with a local memory layer that lives inside your repository. Everything your agents need to hit the ground running — project context, architectural decisions, sprint state — is stored durably in `.vem/` and synced to the cloud so agents can query it instantly.
How vem Memory Works
vem's memory system is built around four durable artifacts, all stored in `.vem/` inside your repository. They are gitignored by default (so secrets never leak) but backed up to the vem cloud for search indexing and team sharing.
CONTEXT.md is your project's "North Star" — a human-readable summary of what the project is, who it is for, and the non-obvious things any new contributor (human or AI) needs to know. CURRENT_STATE.md captures where work stands right now: what just changed, what is in progress, and what is blocked.
The `decisions/` directory holds Architectural Decision Records (ADRs) — one file per decision, recording what was chosen, why, and what was considered and rejected. The `tasks/` directory holds the task backlog and cycle assignments. Together these four artifacts give any AI agent a complete, structured picture of your project before it writes a single line of code.
- CONTEXT.md — project overview and "need to know" facts
- CURRENT_STATE.md — live progress summary updated after each work session
- decisions/ — one ADR file per architectural decision
- tasks/ — structured task backlog with cycle assignments
Step 1 — Write Your First Project Context
Start by writing a concise project context. Open `.vem/CONTEXT.md` in any editor and describe your project in plain language: what it does, the main tech choices, and any gotchas a new developer would need to know on day one.
`vem context show` prints the current context so you can confirm what your agents will see. After editing, run `vem push` to sync it to the cloud immediately.
View and update project context
# Open the context file in your editor
$EDITOR .vem/CONTEXT.md

# Preview what agents see right now
vem context show

# Sync to the cloud after editing
vem push
Step 2 — Record an Architectural Decision
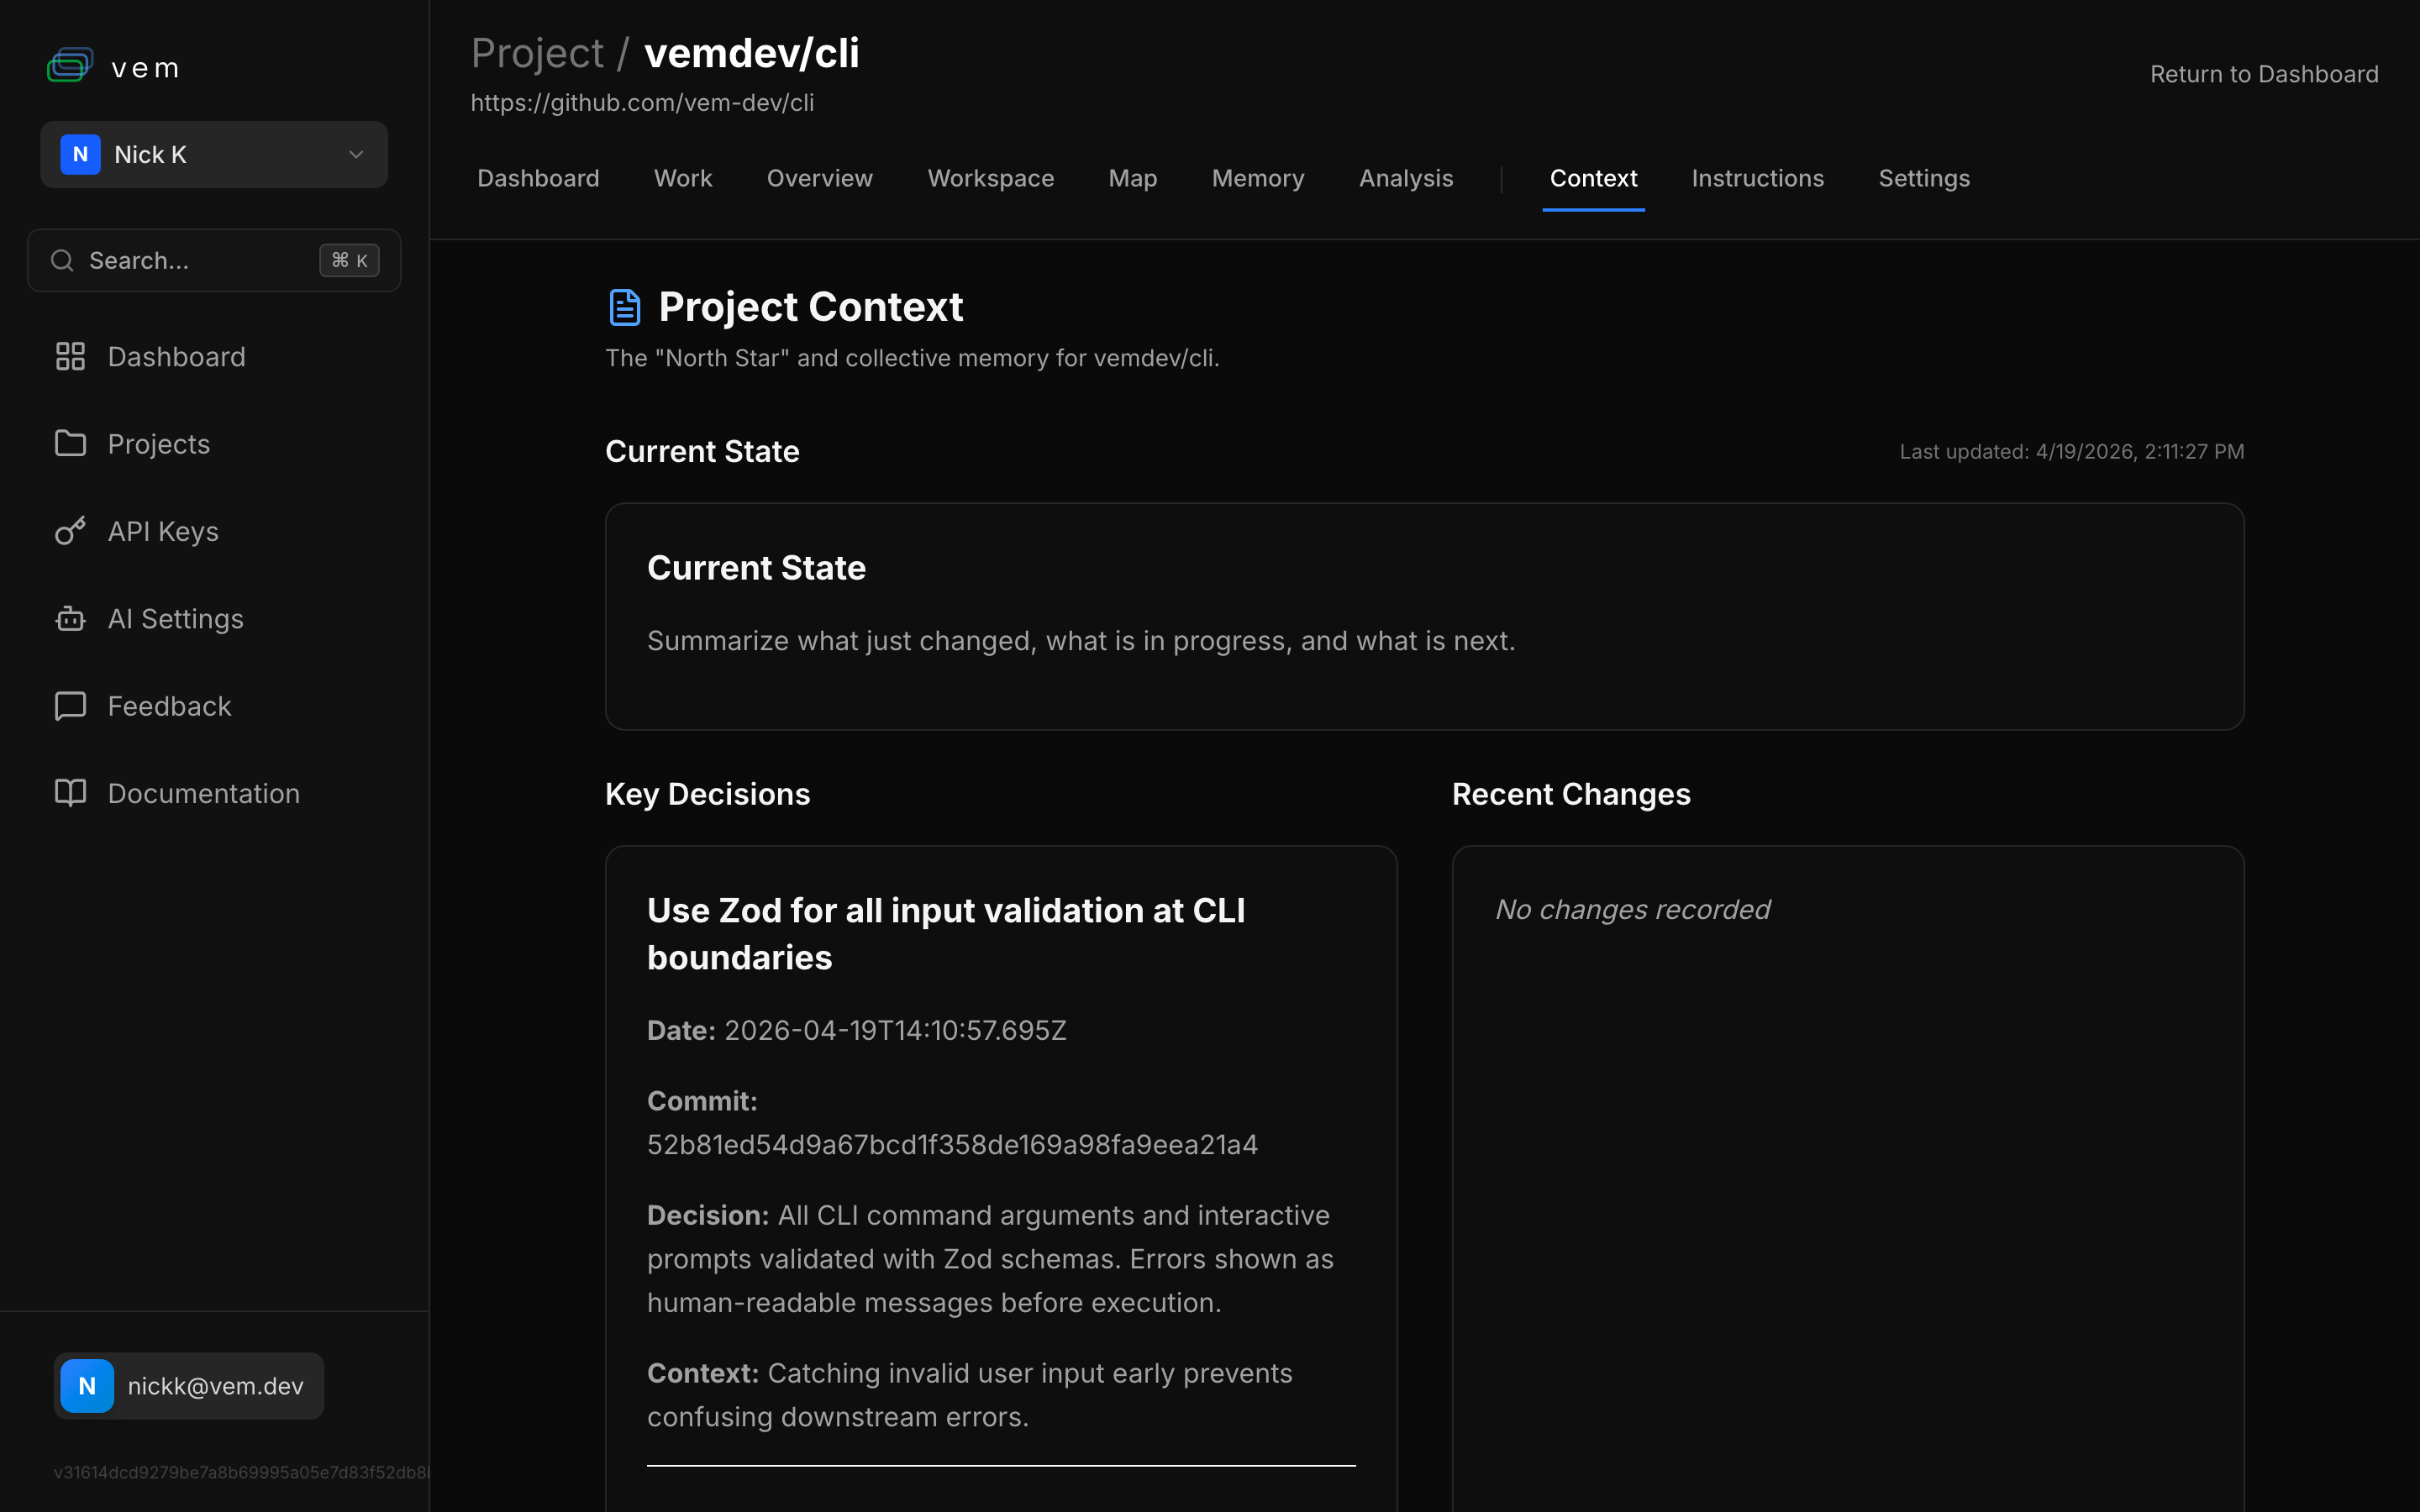
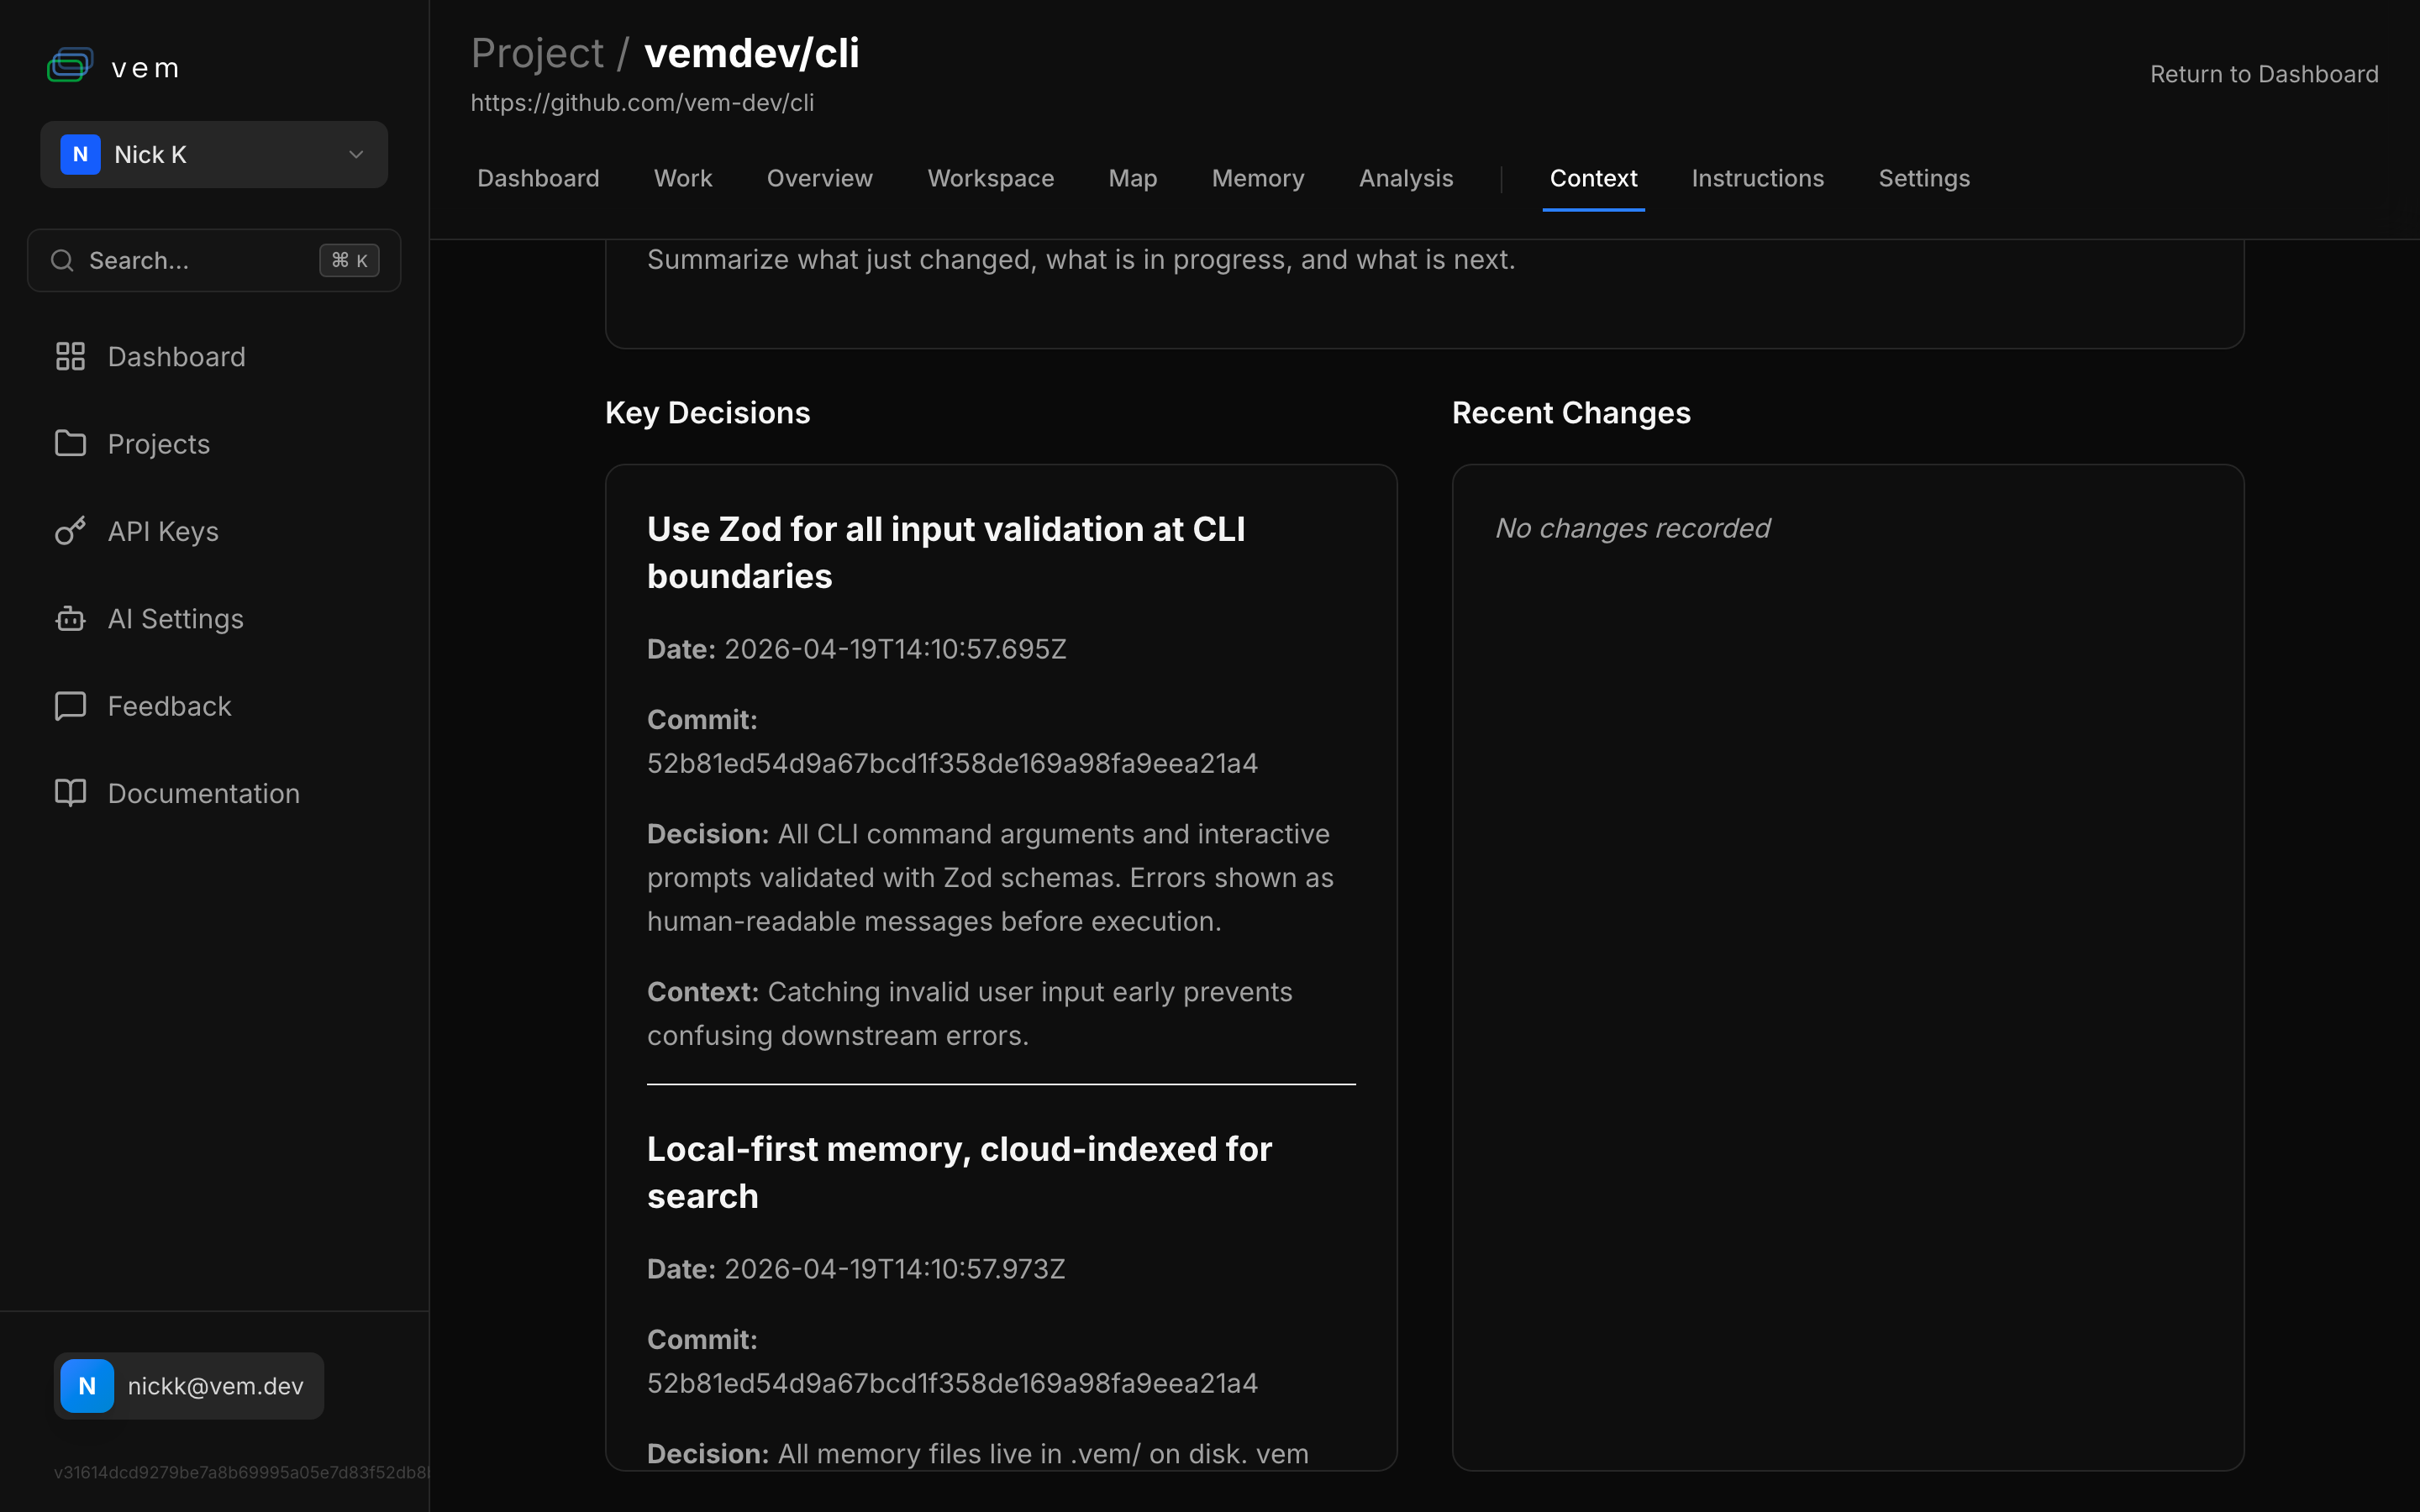
Every non-obvious choice deserves a decision record. `vem decision add` writes an ADR to `.vem/decisions/` and immediately makes it searchable via the MCP server.
Include the context (why you faced this decision) and the decision (what you chose). Future agents — and future you — will understand not just what was chosen but why. This prevents the "why did we do it this way?" confusion that slows down every project after the first month.
Record an architectural decision
vem decision add "Use Zod for input validation at CLI boundaries" \
  --context "Catching invalid user input early prevents confusing downstream errors." \
  --decision "All CLI inputs are validated with Zod schemas before any business logic runs."
Step 3 — See Exactly What Your Agent Sees
`vem pack` generates a structured JSON snapshot of your entire project memory — tasks, context, decisions, and sprint state — in a single block. This is the exact payload that the MCP server sends to your AI agent at the start of each session.
Running `vem pack` manually is the fastest way to audit your memory quality. If the output looks thin or outdated, that is what your agents are working with. A well-maintained pack is the difference between an agent that needs three rounds of clarification and one that writes correct code on the first attempt.
Generate and inspect your memory pack
# Generate the full context pack
vem pack

# Pipe to a file to inspect offline
vem pack > /tmp/my-project-context.json
Step 4 — Ask Questions About Your Project
`vem search` performs semantic search across your project memory — tasks, decisions, context, and changelog entries. It is powered by the vem cloud vector index built from your most recent `vem push`.
This is especially useful for finding related decisions, locating tasks about a specific feature, or checking whether a topic has already been addressed before adding a new decision record.
Search project memory
# Search across all memory artifacts
vem search "error handling"

# Find decisions related to authentication
vem search "auth"

# Find tasks mentioning a specific library
vem search "retry logic"
Step 5 — Connect Any Agent via MCP
The vem MCP server is the bridge between your memory layer and any AI agent that supports the Model Context Protocol: Claude Desktop, Cursor, Copilot, and more. Once connected, your agent calls structured tools to read tasks, search memory, and record decisions — no copy-pasting context into the chat window.
Add the snippet below to your agent's MCP configuration file. Your vem API key is read automatically from `~/.vem/config.json` — you never need to expose it in the config.
Privacy matters: vem uses a Bring Your Own Key model. Your AI provider keys (OpenAI, Anthropic, etc.) are stored only on your local machine and never sent to the vem cloud. The MCP server only transmits your project memory context, not your AI credentials.
Claude Desktop — claude_desktop_config.json
{
  "mcpServers": {
    "vem": {
      "command": "npx",
      "args": ["-y", "@vemdev/mcp-server@latest", "--api-key", "nk_your_key_here"]
    }
  }
}
Tools available to your agent
# Core tools exposed by the vem MCP server (37 total — see full list in README):
# get_active_tasks()     — list current sprint tasks with status
# search_memory(query)   — semantic search across all memory artifacts
# list_decisions()       — fetch all ADRs
# update_task(id, ...)   — mark progress and add evidence
# add_decision(...)      — write a new ADR from the agent session
Step 6 — The Web Memory Dashboard
The vem web app at app.vem.dev gives you a visual view of everything stored in your project memory. The Context tab shows your CONTEXT.md, current state, key decisions, and recent changelog entries all on one page.
The Memory tab hosts a chat interface you can use to ask questions about your project directly from the browser — the same semantic search your agents use, but in a conversational UI. It is particularly useful during onboarding or code review when you need to quickly orient a new contributor.
Step 7 — Implement Tasks Remotely with the vem Agent
vem does not just store context — it can act on it. The vem agent runner lets you trigger AI-powered task implementation from the web dashboard, delegating work to an agent running on your local dev machine or a cloud runner.
From the Workspace tab in app.vem.dev, pick a task and click Run. The vem runner on your local machine picks up the job, launches the configured AI agent (Claude, Copilot, etc.) with your full memory context pre-loaded, implements the task, and reports progress back to the dashboard in real time.
Your AI keys never leave your machine. The vem cloud only orchestrates which task to run and where — the actual agent execution and code changes happen locally. This is BYOK (Bring Your Own Key) by design: vem connects the coordination layer without ever touching your AI provider credentials.
Start the local vem runner
# Start the vem runner — listens for tasks dispatched from the web
vem runner

# Or specify a particular AI agent
vem runner --agent claude

# The runner outputs a secure token you connect in the web Workspace tab
Step 8 — Track Agent Activity with Insights
`vem insights` shows a power score and command frequency breakdown for your project. It surfaces which workflow features you are using, which you are not, and how your agent activity patterns have evolved over time.
The power score is a simple metric (0–100) that rewards high-value behaviours: agent-driven implementation, decision recording, task-driven work, and memory finalisation. It is useful for teams that want to improve their AI workflow maturity over time, and for spotting projects where agents are doing a lot of work but memory is not being maintained.
View workflow insights
# Show power score and command frequency
vem insights
Step 9 — Push Memory to the Cloud
`vem push` publishes a snapshot of your entire `.vem/` memory to the vem cloud. The snapshot is marked `pending` until a matching Git push is detected — at that point it is verified using the `git_hash` + `snapshot_hash` pair and becomes permanently auditable.
Push after any significant session: after adding decisions, after completing tasks, after updating context. Your teammates and any agent connected via MCP will immediately see the updated memory on their next request.
Sync memory to the cloud
# Publish current memory snapshot
vem push

# Check sync and connection status
vem status
Step 10 — Cycle Validation: Memory Stays Correct Over Time
Development never stops. New features can invalidate old decisions, refactors break assumptions captured in CONTEXT.md, and security issues can surface weeks after the original code was written. vem's cycle validation step is designed exactly for this.
When you close a sprint with `vem cycle validate`, vem checks each completed task's validation steps against the current codebase and flags items that need human review. It surfaces tasks that lack evidence of completion, decisions that reference code paths which no longer exist, and context items that are factually outdated.
Run validation at the end of each cycle before you mark it done. It takes less than a minute and ensures your memory layer stays trustworthy — so agents in future cycles don't build on stale or incorrect foundations.
Validate a completed cycle
# Validate the active cycle before closing it
vem cycle validate

# Review specific task validation results
vem cycle validate --task TASK-003

# Close the cycle once validation passes
vem cycle close
The Full Memory Loop
Every AI session should leave the project in a better state than it found it. That means updated context, recorded decisions, completed tasks, and a fresh push to the cloud. With vem, this loop takes under two minutes and pays dividends on every session that follows.
Your agents start each session with full context. Your decisions are permanent and searchable. Your sprint state is always visible. And your memory is verified against your actual Git history — not just a file on disk.
The memory maintenance loop — run after every session
# 1. Inspect what your agents currently see
vem pack

# 2. Record any decisions made this session
vem decision add "..." --context "..." --decision "..."

# 3. Update task progress
vem task done TASK-001 --evidence "Implemented in src/auth.ts, tests pass"

# 4. Refresh current state summary
vem context set --current-state "Completed auth module. Next: add refresh token rotation."

# 5. Push to cloud and verify
vem push
vem status